安装插件包
yum install http://www.percona.com/downloads/percona-release/redhat/0.1-3/percona-release-0.1-3.noarch.rpm -y
yum install percona-zabbix-templates.noarch -y
yum install php* -y
导入模板
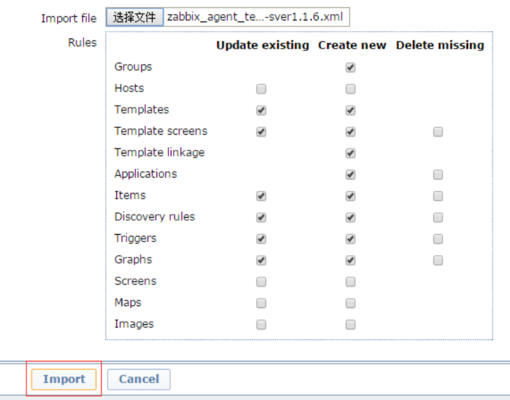
把/var/lib/zabbix/percona/templates/zabbix_agent_template_percona_mysql_server_ht_2.0.9-sver1.1.6.xml 文件拷贝出来,通过 Zabbix 的监控页面导入: ConfigurationTemplatesImport(在右上角) 选择导出的模板文件,点击 Import 完成导入
安装 Agent
rpm -ivh http://repo.zabbix.com/zabbix/2.4/rhel/6/x86_64/zabbix-release-2.4-1.el6.noarch.rpm
yum install zabbix-agent
vim /etc/zabbix/zabbix-agentd.conf
#配置监控服务器地址
Server=192.168.1.15
#导入配置文件
cp /var/lib/zabbix/percona/templates/userparameter_percona_mysql.conf /etc/zabbix/zabbix_agentd.d/
#重启agent
service zabbix-agent restart
Mysql 新建用户
登陆 Mysql 数据库,新建一个本地的只有查询权限的 mysql 用户 grant select on . to 'percona'@'localhost' identified by 'percona'; flush tables;
配置 Percona 插件
修改插件使用的 mysql 用户名密码 sed -i s/cactiuser/percona/g /var/lib/zabbix/percona/scripts/ss_get_mysql_stats.php
测试
测试是否可以获取到值
cd /var/lib/zabbix/percona/scripts/
./get_mysql_stats_wrapper.sh gg
如果获取到值,则说明配置成功

注意:执行完脚本后,请手动删除/tmp/文件夹下生成的*-mysql_cacti_stats.txt 文件,然后让程序自己调用创建新文件。